
Markers
Introduction
In the previous part I showed you how to create a skeleton project using the new Google Naps V2 API for Android.
In this part, I’ll show you some simple ways of dealing with Markers on your map.
Markers have finally become first class citizens in the Google Maps for Android v2 API.
Gone are the days where you need to work with low-level overlays and overlay items to get a simple marker on the Map.
As of v2, we finally have Marker objects and an addMarkerToMap method on the map, so let’s see what we can do with it…
But first we’re going to take a little side-track.
Adding some tabs to our application.
The next 4 parts in this series are included in a single Android demo application that can be downloaded from this GitHub repository. Each part of the series will be shown in an individual tab. For that I’m going to use a wonderful library from Andreas Stütz called PagerSlidingTabStrip that adds a nice set of tabs to the application. Setting up the project is really easy. Go checkout the Github page and download the library and the sample project if you’re interested in finding out more.
The main layout of the application looks like this:
<RelativeLayout xmlns:android="http://schemas.android.com/apk/res/android"
	xmlns:app="http://schemas.android.com/apk/res-auto"
	xmlns:tools="http://schemas.android.com/tools"
	android:layout_width="match_parent"
	android:layout_height="match_parent" >

	<FrameLayout
		android:id="@+id/fragmentContainer"
		android:layout_width="fill_parent"
		android:layout_height="fill_parent" />

	<com.astuetz.viewpager.extensions.PagerSlidingTabStrip
		android:id="@+id/tabs"
		android:layout_width="match_parent"
		android:layout_height="48dip"
		android:background="@drawable/background_tabs" />

	<com.ecs.google.maps.v2.component.CustomViewPager
		android:id="@+id/pager"
		android:layout_width="match_parent"
		android:layout_height="wrap_content"
		android:layout_below="@+id/tabs"
		tools:context=".MainActivity" >
	</com.ecs.google.maps.v2.component.CustomViewPager>

</RelativeLayout>
The actual activity code is also pretty straightforward
We have maintain a reference to
- our
PagerSlidingTabStripcomponent (responsible for drawing the tabs) - our
ViewPagercomponent (responsible for hosting the pages) - our
PagerAdapter(responsible for providing the ViewPager with the pages).
We glue them together by setting the PagerAdapter on the ViewPager, and attaching the ViewPager to the PagerSlidingTabStrip component.
public class TabbedActivity extends SherlockFragmentActivity {

	private PagerSlidingTabStrip tabs;
	private ViewPager pager;
	private MyPagerAdapter adapter;

	@Override
	protected void onCreate(Bundle savedInstanceState) {
		super.onCreate(savedInstanceState);
		requestWindowFeature(Window.FEATURE_INDETERMINATE_PROGRESS);
		setContentView(R.layout.activity_tabs);

		tabs = (PagerSlidingTabStrip) findViewById(R.id.tabs);
		pager = (ViewPager) findViewById(R.id.pager);
		adapter = new MyPagerAdapter(getSupportFragmentManager());

		pager.setAdapter(adapter);

		final int pageMargin = (int) TypedValue.applyDimension(TypedValue.COMPLEX_UNIT_DIP, 8, getResources()
				.getDisplayMetrics());
		pager.setPageMargin(pageMargin);

		tabs.setViewPager(pager);

	}
The component gives us a nice look and feel as far as tabs are concerned, resembling the way the Google Play store does it. I highly recommend you taking a look at the PagerSlidingTabStrip project.
Screenshots
Gingerbread

ICS and Jelly Bean

Note again that on Gingerbread (using a Samsung Galaxy S in this case), the overflow menu on the ActionBar is not shown because the device has a hardware menu button. On the Jelly Bean device (Samsung Galaxy Nexus) the overflow menu is shown.
Adding markers to the map
Adding a marker to the map is very simple. The only thing you need to do is call the addMarkerToMap method on the googleMap. Notice how we also store the returned marker from the addMarkerToMap method in an ArrayList here in order to do some Marker management later on.
public void addMarkerToMap(LatLng latLng) {
	Marker marker = googleMap.addMarker(new MarkerOptions().position(latLng)
			 .title("title")
			 .snippet("snippet"));
	markers.add(marker);

}
A title and snippet can be provided to be displayed on the InfoWindow when selecting the marker.
Marker management
The googleMap doesn’t expose a list of markers that have been added to the map, nor does it track the currently selected marker. In other words, you’ll need to do your own marker management. Marker management is all about having a flexible way to keep track of the markers being used on your app, so that you can refer to them in an easy way.
It comes in handy when you want to interact with markers without going through the standard callbacks of the googleMap.
When you have a marker somewhere on the map and you didn’t store the resulting marker in a list, the only way to access the marker again is by clicking on it, and using the marker argument in the callback.
googleMap.setOnMarkerClickListener(new GoogleMap.OnMarkerClickListener() {

			@Override
			public boolean onMarkerClick(Marker marker) {
				return false;
			}
		}
);
If you wan to print all the markers on the map, programmatically highlight a specific marker, or jump from one marker to another you cannot do it unless you have some way of referencing these markers. By keeping the track of the markers in an external list we can add some flexibility regarding the way we can interact with these markers.
The selected marker
It’s always interesting to know what marker is currently selected, and that’s also part of Marker management. Suppose you have a use-case where a user can select a marker, and pull up a menu to delete that marker. The action to delete the marker needs to know what marker should be deleted, so it needs to rely on an instance variable for that.
Our method to remove the selected marker would look like this:
public void removeSelectedMarker() {
	this.markers.remove(this.selectedMarker);
	this.selectedMarker.remove();
}
As we have a reference to the selected marker, it’s simply a matter of removing it from our internal list and removing it from the map. Keep in mind that it’s your responsibility to make sure the internal list is kept in sync with whatever is shown on the map.
Highlighting a marker
If you want to highlight a marker, you typically want to change it’s appearance. One of the things you can change very easily now (since the latest Google Play Services update) is the icon on the map.
There are 2 ways to highlight a marker
- Clicking on a marker
- Programmatically highlight a marker.
Info Windows
The default behavior when clicking on a marker is
- move the camera to the marker
- show an info window on the marker.
If you want to intercept the user clicking on a marker, you simply need to implement an OnMarkerClickListener
googleMap.setOnMarkerClickListener(new GoogleMap.OnMarkerClickListener() {

			@Override
			public boolean onMarkerClick(Marker marker) {
				return false;
			}
		}
);
- You return false if the default behavior should occur.
- You return true if the listener has consumed the event and you don’t want the default behavior to occur).
For example suppose you want to change the color of the marker when clicking on it, but you don’t want to shown the infoWindow or move the camera. In that case you could call the following function in the onMarkerCick(Marker marker).
private void highLightMarker(Marker marker) {

	for (Marker foundMarker : this.markers) {
		if (!foundMarker.equals(marker)) {
			foundMarker.setIcon(BitmapDescriptorFactory.defaultMarker(BitmapDescriptorFactory.HUE_RED));
		} else {
			foundMarker.setIcon(BitmapDescriptorFactory.defaultMarker(BitmapDescriptorFactory.HUE_AZURE));
			foundMarker.showInfoWindow();
		}
	}

	this.selectedMarker=marker;
}
If you want to programmatically highlight a marker, and you either have a reference to it, or you know the index of the marker, simply call the highlightMarker directly. It will maintain the proper state (selectedMarker) and do the highlighting.
Custom InfoWindows
The default infoWindow looks like this :

You can customize the infoWindow by specifying your own layout file:
<?xml version="1.0" encoding="utf-8"?>
<LinearLayout xmlns:android="http://schemas.android.com/apk/res/android"
	android:layout_width="fill_parent"
	android:layout_height="wrap_content"
	android:orientation="horizontal">

	<ImageView
		android:id="@+id/icon"
		android:layout_width="wrap_content"
		android:layout_height="wrap_content"
		android:layout_gravity="center_vertical"
		android:padding="2dip"
		android:src="@drawable/ic_launcher"
		android:contentDescription="@string/icon"/>

	<LinearLayout
		android:layout_width="fill_parent"
		android:layout_height="wrap_content"
		android:orientation="vertical">

		<TextView
			android:id="@+id/title"
			android:layout_width="wrap_content"
			android:layout_height="wrap_content"
			android:textSize="25sp"
			android:textStyle="bold"/>

		<TextView
			android:id="@+id/snippet"
			android:layout_width="wrap_content"
			android:layout_height="wrap_content"
			android:textSize="15sp"/>
	</LinearLayout>

</LinearLayout>
You also need to create an InfoWindowAdapter that will inflate the layout. The layout contains an icon and we set the title and the snippet on the layout as well, passing it in via the marker.
import android.view.LayoutInflater;
import android.view.View;
import android.widget.TextView;

import com.ecs.google.maps.v2.actionbarsherlock.R;
import com.google.android.gms.maps.GoogleMap.InfoWindowAdapter;
import com.google.android.gms.maps.model.Marker;

public class IconizedWindowAdapter implements InfoWindowAdapter {
  LayoutInflater inflater=null;

  public IconizedWindowAdapter(LayoutInflater inflater) {
	this.inflater=inflater;
  }

  @Override
  public View getInfoWindow(Marker marker) {
	return(null);
  }

  @Override
  public View getInfoContents(Marker marker) {
	View popup=inflater.inflate(R.layout.marker_tooltip, null);

	TextView tv=(TextView)popup.findViewById(R.id.title);

	tv.setText(marker.getTitle());
	tv=(TextView)popup.findViewById(R.id.snippet);
	tv.setText(marker.getSnippet());

	return(popup);
  }
}
And finally we need to set the InfoWindowAdapter on the map
googleMap.setInfoWindowAdapter(new IconizedWindowAdapter(getActivity().getLayoutInflater()));
The result looks like this:
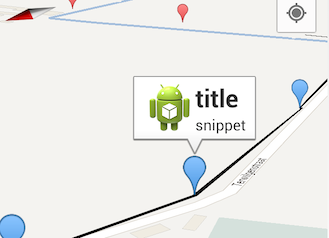
Custom markers
Besides having custom info windows, it’s also possible to put custom markers on the map. The easiest way to do that is to use the setIcon method on the MarkerOptions.
markerOptions.icon(BitmapDescriptorFactory.fromResource(R.drawable.arrow)));For some more advanced custom markers, I recommend you checkout the excellent android-maps-utils project on Github.
It’s a library project that you can add to your project and offers a BubbleIconFactory capable of creating Bitmaps that can be put on your marker.
BubbleIconFactory factory = new BubbleIconFactory(getActivity());
factory.setStyle(Style.PURPLE);
factory.setRotation(360);
factory.setContentRotation(90);
Bitmap bitmap = factory.makeIcon("This is a test");
The result looks like this:

Some useful methods to have to manage your markers
If you’re working with maps a lot, and you have more than one app that uses maps, it’s interesting to encapsulate all of this into your own custom map fragment. The following generic methods can be placed on the MapFragment so that you can not only drop the fragment into your layout, but also re-use a lot of the business logic associated with marker management.
Adds a marker to the map.
public void addMarkerToMap(LatLng latLng) {
	Marker marker = googleMap.addMarker(new MarkerOptions().position(latLng)
			 .title("title")
			 .snippet("snippet"));
	markers.add(marker);

}
Clears all markers from the map.
public void clearMarkers() {
	googleMap.clear();
	markers.clear();
}
Remove the currently selected marker.
public void removeSelectedMarker() {
	this.markers.remove(this.selectedMarker);
	this.selectedMarker.remove();
}
Highlight the marker by index.
private void highLightMarker(int index) {
	highLightMarker(markers.get(index));
}
Highlight the marker by marker.
private void highLightMarker(Marker marker) {
	marker.setIcon(BitmapDescriptorFactory.defaultMarker(BitmapDescriptorFactory.HUE_AZURE));
	marker.showInfoWindow();
	this.selectedMarker=marker;
}
Polylines
You can also draw polyLines onto the map. For that you need to create a Polyline and a PolylineOptions
private Polyline polyLine;
private PolylineOptions rectOptions = new PolylineOptions();
You get a reference to a polyLine by adding it to the map by calling the addPolyLine method.
polyLine = googleMap.addPolyline(rectOptions);
In our sample, as we add markers to the map we also update the polyLine so that the markers are connected. We do this by adding our the newly dropped marker onto the polyLine. Notice how we need to call setPoints again. Simply doing polyLine.getPoints().add(latLng) doesn’t work.
/**
 * Add the marker to the polyline.
 */
private void updatePolyLine(LatLng latLng) {
	List<LatLng> points = polyLine.getPoints();
	points.add(latLng);
	polyLine.setPoints(points);
}
Re-usability
A lot of the stuff we’ve discussed here are generic / re-usable that you want to have at your disposal when dealing with maps. It’s important to position them on the proper level in your code.
Placing them on a custom MapFragment subclass is an ideal way to promote re-use as
- the methods are tightly coupled with the map
- the methods are eligable for re-used
- the MapFragment containing these methods can be easily embedded in another layout